Elementor is a popular page builder plugin for WordPress that allows users to create custom designs for their website. One of the most important design elements of any website is the header section. In this post, we will discuss how to create a custom Elementor header and why it’s important for your website.
A custom header refers to a header section that is designed and made by the website owner or developer according to their preferences and needs. Unlike a pre-made header template, a custom header gives you complete control over the design and functionality of your website’s header.
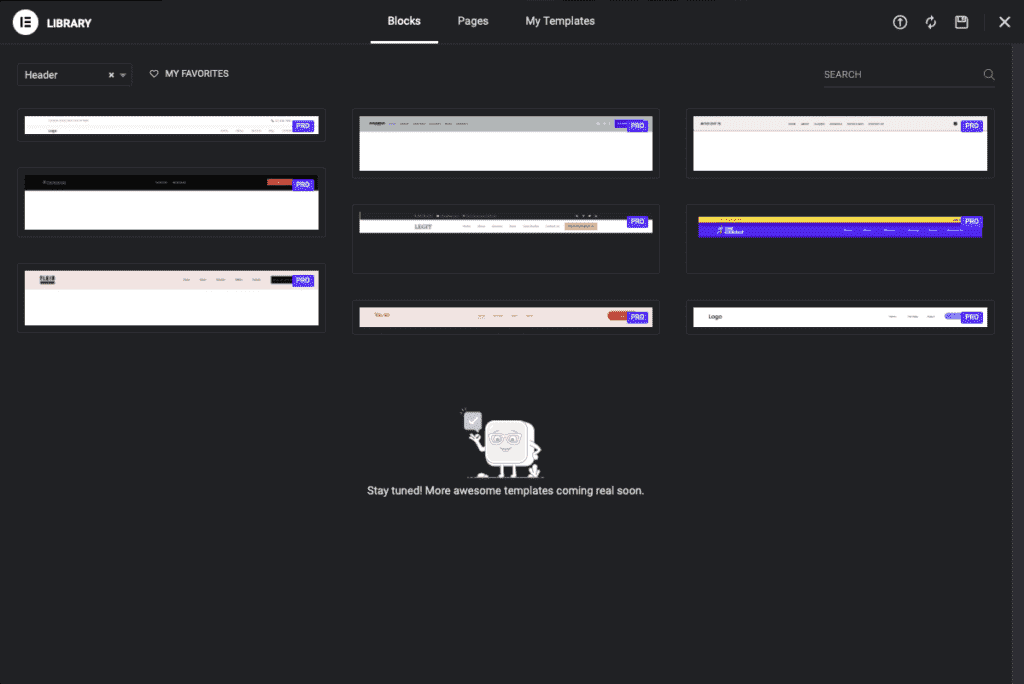
To create a new custom Elementor header, simply go to the Theme Builder feature
in Elementor and select “Header.” From there, you can choose to start from scratch or import an existing template.
One of the key benefits of using Elementor’s Theme Builder feature is that it allows you to easily add different widgets and modules to your custom header design.
For example, you can use the Nav Menu widget to add a navigation menu to your new header design.
Another benefit of creating a custom header Elementor is that it helps improve user experience on your website. A well-designed and functional header can make it easier for visitors to navigate your site and find what they’re looking for.
Having a unique and visually appealing custom header can help make your brand stand out online. With so many websites out there competing for attention, having a memorable and distinctive design can help attract more visitors to your site.
Benefits of Using Elementor for Custom Headers
User-Friendly Interface for Custom Header Creation
Elementor is a powerful tool that provides an intuitive and user-friendly interface for creating custom headers. With its drag-and-drop functionality, users can easily add and rearrange design elements within the header section.
This feature saves time and effort in the design process, allowing users to focus on creating a visually appealing header that matches their website’s overall design.
Responsive Design for All Devices
Custom headers created with Elementor are responsive, ensuring that they look great on all devices, including desktops, tablets, and smartphones.
This feature is essential in today’s mobile-first world where more than half of internet traffic comes from mobile devices.
With Elementor’s responsive design capabilities, users can create custom headers that adapt to different screen sizes without losing their visual appeal.
Endless Possibilities with Design Elements
Elementor provides access to a wide range of design elements such as typography, colors, backgrounds, and animations. These elements offer endless possibilities when creating custom headers. Users can choose from hundreds of fonts and color schemes to match their website’s branding or create a unique look that stands out from the competition.
Save Time with Reusable Templates
One of the most significant benefits of using Elementor for custom headers is the ability to save them as templates and reuse them throughout the website or on other websites. This feature ensures consistency in design and branding across different pages or sites while saving time in the design process.
Integrate Third-Party Plugins for More Customization Options
Elementor allows integration with third-party plugins and widgets, providing even more customization options when creating custom headers.
For example, integrating social media icons into the header section allows visitors to connect with a brand’s social media profiles directly from the website’s homepage.
Case Study: How Elementor Helped Increase Conversion Rates
A case study conducted by WPBeginner showed how using Elementor helped increase conversion rates by 10%. The study found that the custom header created with Elementor was more visually appealing and user-friendly than the previous header design. This change resulted in a significant increase in engagement and conversion rates.
Analysis: The Impact of Custom Headers on User Experience
Custom headers play a crucial role in improving user experience on websites. A study conducted by Stanford University found that users form their first impression of a website within 50 milliseconds of landing on it. This means that having a visually appealing and well-designed custom header can significantly impact how users perceive a website’s credibility and trustworthiness.
Key Features and Tools in Elementor for Header Customization
Features of Elementor for Header Customization
Logo, Menu, and Social Icons
Elementor offers a range of features that allow users to customize their website’s header. One of the most basic features is the ability to add logos, menus, and social icons. With Elementor’s drag-and-drop interface, users can easily add these elements to their header and adjust their size and position.
Theme Builder
For more advanced customization options, Elementor’s Theme Builder allows users to create custom headers that are unique to their website’s design and branding.
This feature gives users complete control over the look and feel of their header, including the ability to add custom CSS code.
Header & Footer Builder
The Header & Footer Builder is another powerful tool for customizing headers in Elementor.
This feature allows users to easily customize headers across all pages of their website.
Users can choose from a variety of pre-designed templates or create a completely custom header from scratch.
Additional Header Widgets
Elementor Pro includes additional header widgets such as search bars, login forms, and cart icons. These widgets provide added functionality to the header and make it easier for visitors to navigate the website.
Sticky Header
One important feature of Elementor’s header customization tools is the Sticky Header option. When enabled, this feature ensures that the header remains visible at all times as visitors scroll down the page. This provides easy navigation for visitors and keeps important information (such as contact information or a call-to-action) always visible.
Step-by-Step Guide to Creating a Custom Elementor Header
Choose the header type you want to create
Before creating a custom Elementor header, it’s important to determine what type of header you want to create. There are several types of headers available in Elementor, including a simple header with a logo and navigation menu, a full-screen header with background images or videos, and a sticky header that stays fixed at the top of the page as users scroll down.
Once you have decided on the type of header you want to create, open Elementor and navigate to the “Templates” section. From there, click on “Header” and select “Add New”. This will bring up a blank canvas where you can start designing your custom header.
Add a new section to the header template
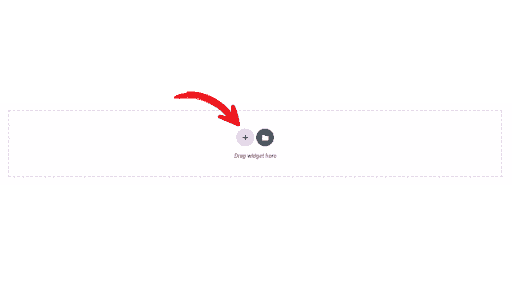
To add a new section to your custom Elementor header template, simply click on the plus icon located in the middle of the canvas. This will bring up an options panel where you can choose from various pre-designed sections or create your own from scratch.
Customize the section by adding widgets and adjusting settings
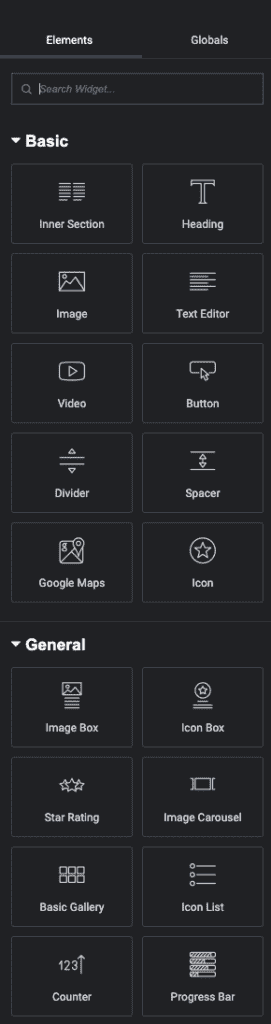
Once you have added a new section to your custom Elementor header template, it’s time to customize it by adding widgets and adjusting settings. To add widgets, simply drag them from the left-hand sidebar onto your canvas. You can add various widgets such as text boxes, images, icons, buttons, and more.
To adjust settings for each widget or section element in your custom Elementor header template, simply click on it and navigate through its options panel.
Save the header template and assign it to your website’s pages
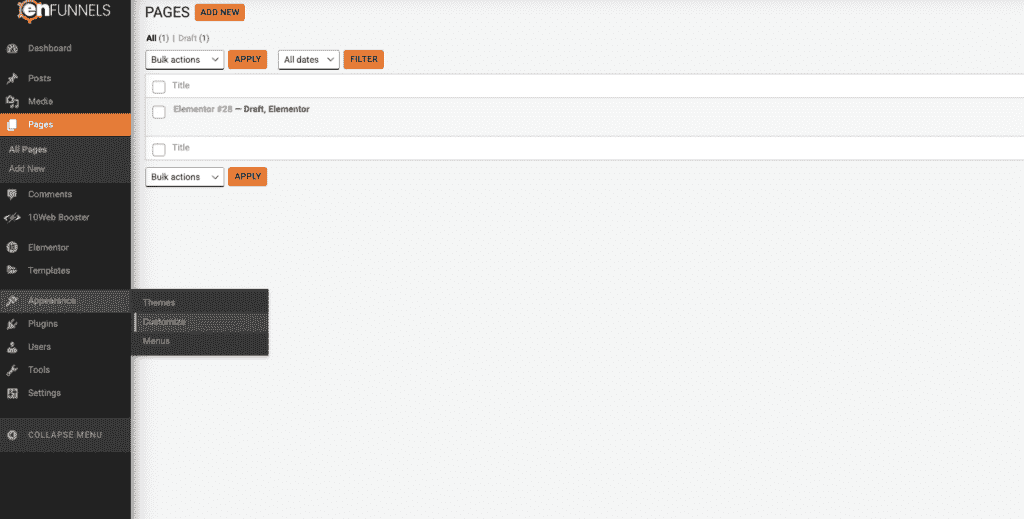
Once you have finished designing and customizing your custom Elementor header, make sure to save it by clicking on the green “Publish” button located in the bottom left-hand corner of the canvas. After saving, you can assign your custom header template to specific pages on your website by going to “Appearance” > “Customize” > “Header & Navigation” > “Header Style” and selecting your newly created custom Elementor header from the dropdown menu.
Preview and test the custom header on your website
After assigning your custom Elementor header template to specific pages on your website, it’s important to preview and test it to ensure that everything is working as expected. Simply navigate to one of the pages where you have assigned your new custom Elementor header and check that all elements are displaying correctly and functioning properly.
Tips and Tricks for Maximizing Elementor’s Capabilities in Header Design
Create a visually appealing header design with the Elementor Mega Menu widget
The header of your website is the first thing that visitors see when they land on your site. It is essential to create a visually appealing and functional header design that captures their attention and encourages them to explore further. One way to achieve this is by using Elementor Mega Menu widget.
The Elementor Mega Menu widget allows you to create an advanced menu system that includes images, icons, and other visual elements. You can use this feature to display your products or services, showcase your latest blog posts, or highlight important pages on your website.
To get started with the Elementor Mega Menu widget, you need to add it to your header template. Once added, you can customize the layout, font size, colors, and other design elements according to your preferences. You can also choose from different menu types such as dropdowns, flyouts, or full-screen overlays.
Incorporate custom fonts and colors into your header design
Customizing the fonts and colors of your header is another effective way to make it stand out and match your brand’s aesthetic. Elementor provides several options for customizing these elements in its editor.
You can choose from hundreds of Google Fonts or upload custom fonts that align with your brand identity. Similarly, you can select from a wide range of color palettes or create a custom one using the color picker tool.
When selecting fonts and colors for your header design, it is crucial to consider their readability and contrast against the background color. Using high-contrast combinations will ensure that users can easily read the text on your header regardless of their device’s screen size.
Utilize Elementor’s sticky header feature
One common problem with headers is that they may disappear as users scroll down a page. This issue makes it difficult for visitors to navigate through your website and access important information. Elementor’s sticky header feature solves this problem by keeping your header visible at all times, even as users scroll down the page.
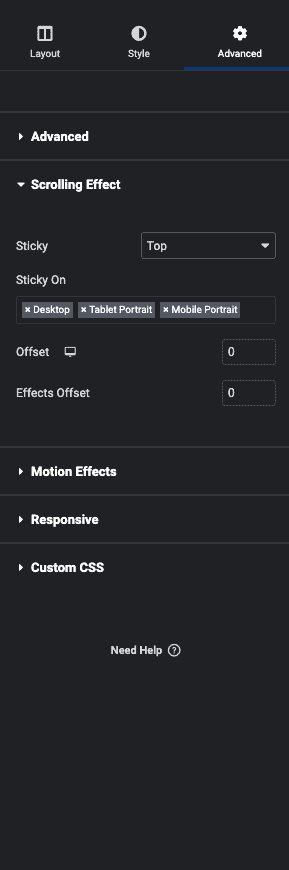
To enable the sticky header feature, you need to go to the advanced settings of your header template and select “sticky” from the position dropdown menu. You can also customize other settings such as the background color, opacity, and animation effects.
Experiment with different layouts and designs
Finally, it is essential to experiment with different layouts and designs to find the one that best suits your website’s needs and goals. Elementor provides a wide range of pre-designed templates that you can use as a starting point for your header design.
You can also create custom headers from scratch using Elementor’s drag-and-drop editor. This approach allows you to add or remove elements easily until you achieve the desired look and functionality.
Visual Examples of Unique and Functional Elementor Headers
Unique and functional headers are essential for any website to stand out in today’s competitive digital world. Elementor offers a variety of header design options that can be customized to fit the specific needs of any website. In this post, we will explore some visual examples of unique and functional Elementor headers.
Sticky Headers
One popular header design option is a sticky header, which remains fixed at the top of the page as users scroll down. Sticky headers provide easy access to navigation menus and other important information without having to scroll back up to the top of the page. With Elementor, sticky headers can be easily created by selecting the “sticky” option in the header settings. The design can then be customized with different colors, fonts, and logos.
Complex Navigation Menus
Another option for customizing Elementor headers is creating complex navigation menus. These menus can include dropdowns, mega-menus, or other interactive features that enhance user experience. With Elementor’s flexible widget options, it’s easy to add these features to a custom header template.
For example, a travel website may want to create a dropdown menu that includes destinations organized by region or activity type.
Unique Layouts
Elementor also offers unique layout options for custom headers that go beyond traditional horizontal designs. A vertical header layout can be used to display important information such as contact details or social media links on one side of the screen while leaving space for content on the other side. Another option is using a split-screen layout where two sections are displayed side-by-side in the header area.
Widgets and Logos
In addition to custom layouts and navigation menus, widgets and logos can also be added to an Elementor header template for enhanced functionality and style. Widgets such as search bars or social media icons can be added directly into the header area without taking up valuable space on other parts of the page. Logos can also be easily uploaded and resized within the header settings.
Creating New Templates and Styles
With Elementor’s header options, the possibilities for creating new templates and styles are endless. Custom headers can be designed to fit any type of website, from a simple blog to a complex e-commerce site. By experimenting with different layouts, widgets, and navigation menus, web designers can create unique and functional headers that enhance user experience and make their website stand out.
Common Issues and Solutions When Creating a Custom Elementor Header
Incompatibility Issues with WordPress Themes
When creating a custom Elementor header, one of the most common issues that can arise is incompatibility with certain WordPress themes. This can be frustrating for website owners who have invested time and money into designing their website, only to find out that their custom header does not work properly.
To avoid this issue, it is important to research and choose a WordPress theme that is compatible with Elementor. This will save you time and effort in the long run as you won’t have to deal with compatibility issues.
Incorrect Placement of Header Elements
Another issue that can occur when creating a custom Elementor header is incorrect placement of header elements. This can cause layout and design problems on different devices, such as desktops, tablets, and mobile phones.
To ensure proper placement of header elements, it is important to test your custom header on different devices before publishing it live on your website. You should also consider using responsive settings in Elementor to adjust the placement of header elements based on the device being used.
Too Many or Too Few Header Elements
The use of too many or too few header elements can also affect the overall user experience and navigation on your website. If there are too many elements in your custom header, it can overwhelm users and make it difficult for them to navigate through your site. On the other hand, if there are too few elements, users may not be able to find what they are looking for easily.
To strike a balance between usability and simplicity, consider including only essential elements in your custom Elementor header. This could include a logo, navigation menu, search bar, social media icons etc.
Poorly Optimized Images and Graphics
Another factor that can impact the performance of your custom Elementor header is poorly optimized images and graphics. Large image files or graphics can slow down website loading speed which negatively affects user experience.
To optimize images for web use without compromising quality:
- Resize images to the appropriate size.
- Compress images using tools like TinyPNG, Compressor.io or ShortPixel.
- Use the right image format for your needs. For example, use JPEG for photographs and PNG for graphics with transparent backgrounds.
Failure to Properly Configure Responsive Settings
Responsive design is essential in today’s mobile-first world. Failure to properly configure responsive settings for your custom Elementor header can result in display issues on mobile devices.
To ensure that your custom header looks great on all devices, test it thoroughly across different screen sizes and orientations. You should also consider using responsive settings in Elementor to adjust the placement of header elements based on the device being used.
Lack of Testing and Troubleshooting
Finally, lack of testing and troubleshooting can lead to errors and bugs in your custom Elementor header. This can negatively impact user experience and make your website look unprofessional.
To avoid this issue, thoroughly test your custom header before publishing it live on your website. This includes testing it across different devices, browsers, and screen sizes. If you encounter any issues or bugs, troubleshoot them promptly to ensure a smooth user experience.
Promoting the Use of Elementor for Website Building Needs
Using Elementor for Website Building Needs
Elementor is a powerful page builder plugin that can be used to design and build websites on WordPress. It offers a range of features and functionalities that make it an excellent choice for building custom headers, footers, and other website elements. In this section, we will discuss the benefits of using Elementor for your website building needs.
Complete Control Over Website Design
One of the most significant advantages of using Elementor is that it gives users complete control over the design of their entire site. With the Elementor Theme Builder, users can create custom headers, footers, and other website elements with ease. This means that you can create a unique look for your site without having to rely on pre-built templates or themes.
Improved User Experience
The user experience is greatly improved when using Elementor as it allows for easy customization and a more professional-looking website design. With its drag-and-drop interface, users can easily add new elements to their pages and posts without having to write any code. Elementor widgets provide additional functionality such as contact forms, social media links, and more.
Access to Additional Widgets and Theme Support
Elementor Pro offers even more features and functionality for building and designing websites. Users have access to additional widgets such as pricing tables, countdown timers, testimonials, and more. Theme support ensures that your site looks great across all devices.
Custom Footer Builder
Another advantage of using Elementor is its custom footer builder which allows users to create unique footers for their sites. This feature enables you to add important information such as copyright notices or links to social media profiles at the bottom of every page on your site.
Easy Integration with WordPress Websites
Elementor integrates seamlessly with WordPress websites making it easy for users to get started quickly. The plugin works with any WordPress theme so you don’t have to worry about compatibility issues.
Case Study: How Using Elementor Improved Website Design
A recent case study conducted by a web design agency found that using Elementor significantly improved the website design for one of their clients. The client’s previous site was outdated and difficult to navigate. After switching to Elementor, the agency was able to create a more modern and user-friendly site that resulted in increased traffic and engagement.
Call to Action: Encouraging Readers to Try Elementor or Sign Up for More Tips
Use a Call to Action in Custom Header Elementor
Adding a call to action (CTA) to your website is an effective way to encourage readers to take action. A CTA can be used to prompt visitors to sign up for a newsletter, download an ebook, or even make a purchase. In this section, we will discuss how you can use custom header elementor to add a CTA and encourage readers to try Elementor or sign up for more tips.
To add a CTA using custom header elementor, you can use buttons or a sidebar form. Buttons are perfect if you want the CTA to stand out and grab the reader’s attention. On the other hand, a sidebar form is ideal if you want the CTA to be less intrusive but still visible.
If you are new to custom header elementor, don’t worry! There are many video tutorials available that guide you through the process of adding a CTA. These step-by-step guides will help you understand how custom header elementor works and how you can create your own CTAs.
Install Free Plugin for Additional Support
To get additional support and customization options, consider installing a free plugin. There are many plugins available that work well with custom header elementor and allow you to create more advanced CTAs. Some popular plugins include WPForms, Contact Form 7, and Gravity Forms.
Ensure Mobile-Friendly and Responsive Design
It’s important that your CTA is mobile-friendly and responsive on both tablet and mobile devices. This means that it should be easy for users on these devices to see and interact with the CTA without any difficulty.
Encourage Readers Sign Up for More Tips
Finally, it’s important that you encourage readers to sign up for more tips and support from the Elementor editorial team. This will help keep them engaged with your website and provide them with valuable information that they may not have found otherwise.
Summary of Key Points and Importance of Custom Elementor Headers
In conclusion, custom Elementor headers are a crucial aspect of website design and can greatly enhance the user experience. By utilizing the various features and tools available in Elementor, users can create unique and functional headers that not only look great but also improve website navigation and overall functionality.
From creating a step-by-step guide to designing a custom header to providing tips and tricks for maximizing Elementor’s capabilities, this blog post has covered everything you need to know about custom Elementor headers. Visual examples have been provided to showcase the endless possibilities when it comes to designing your own header.
It is important to note that while creating a custom Elementor header may seem daunting at first, with practice and patience anyone can master this skill. The benefits of using Elementor for header customization are numerous, including increased website traffic, improved user engagement, and enhanced brand recognition.

Overall,the use of Elementor for website-building needs is essential in today’s digital age. With its user-friendly interface and extensive customization options, it is no wonder why so many individuals and businesses alike are turning to Elementor for their web design needs.
So what are you waiting for? Try out Elementor today or sign up for more tips on how to take your web design skills to the next level!